Castle Conquest 2
Castle Conquest 2 is a project about capturing a castle or prevent the attackers from capturing it.
General
What is CastleConquet 2
CastleConquets 2 (CC2) is a Minecraft PvP minigame project about capturing and defending a castle. It consists of multiple gamemodes and currently one map.
The gamemodes are Conquest, Rush, Lynchmob and Siege, of which Conquest is currently available, while the other ones are currently under development.
The castle has special features. Doors require keys or can be controlled centrally, there are cameras, a large surveillance monitor and power management. Some of these things can be upgraded during the game.
Attackers can get into the castle by digging their way in, scaling the wall with a siege tower, blowing up the castle gate or taking a key from a defender (by killing them).
There are also villages outside from which you can get equipment.
Conquest is currently the only playable game mode. It is about capturing and holding flags in the castle. If the attackers hold more than half of the flags for 5 minutes, they win. The defenders win if the attackers do not manage to capture the castle within 30 minutes.
Gamemodes
- Conquest
Capture and hold enough flags in the castle to win. - Rush
Complete the objectives in the current zone to proceed to the next one. You win if you make it to the last one. - Lynchmob
Defend the king from the angry lynch mob. - Siege
Hold the castle to gain reputation in the villages. Your team wins when it reaches a specific amount of it.
The Map
While the project theoretically supports multiple maps, there is currently only one map.
A map is not just simply a map like in other minigames. CC2 maps are very large and they require their own implementation for their special featureson.
A map has many special features, like keycard doors, a control room with a big status screen, remote door controls, cameras, etc... There is power management where attackers can potentially cut off the power of the castle. There are also several Ways to get into the castle, like stealing keycards from defenders, blowing up doors, breaking the wall or the castle gates, placing a siege tower in front of a wall and so on.
Conquest Mode
Conquest is the default game mode of the CastleConquest 2 project.
It is about capturing and holding flags.
If the attackers manage to hold enough flags for a certain time, they win, otherwise the defenders win.
Game Concept (Conquest)
General
Conquest is the default game mode of the CastleConquest 2 project. It is a further development of the game mode from the old "BurgConquest" (official name of CastleConquest 1)
It is about capturing and holding flags. If the attackers manage to hold enough flags for a certain time, they win, otherwise the defenders win.
Summary
There are two teams: attackers and defenders. The attackers start in a dedicated attacker spawn. The defenders, on the other hand, start in the castle.
There are several flags in the castle. These belong to the defenders at the start.
The aim of the attackers is to hold more than half of all flags for 5 minutes. If they succeed, they win the game.
However, the attackers have a time limit of 30 minutes. If they do not manage to fulfill this condition by then, the defenders win.
Rules
Teams
- Defenders: Have to prevent the attackers from capturing the castle
- Attackers: Have to capture the castle
Timers
There are two mutually exclusive times.
The game time counting down when the attackers don't have the required amount of flags to win. When the game time has expired, the attackers lose and the defenders win. The game time is paused as long as the flag timer is active.
The flag timer is counting down then the attackers have the required amount of flags to win When the flag timer has expired, the attackers win and the defenders lose. The flag timer is counting up when until it has reached 5 minutes when it is not active.
If one of the timers expires, an overtime can be triggered under certain circumstances. If the overtime is active, the corresponding timer is stopped until the overtime has ended. See section Overtime for more information.
Required flags
Required flags for the attackers: More than half of all flags.
The default map has 6 flags. Therefore, the attackers need to hold at least 4 flags to meet the required flags amount.
Overtime
Overtime can be triggered if a team is currently capturing so many flags that the timer condition for the team could still be fulfilled if nothing changes in the current situation.
For example, if the attackers have 3/6 flags and are currently capturing 1 flag and the game time expires while they are still capturing that flag, the game time will pause so that the attackers can finish capturing this flag, which will enable the flag timer.
Another example, if the attackers currently have all 6/6 flags but the defenders are currently capturing 2 flags at the same time and the flag timer expires, the flag timer will pause so that the defenders can finish capturing both flags which would stop the flag timer.
For the overtime system, "a team is currently capturing a flag" when the team has any progress on it (States: Capturing, Uncapturing, IDLE with progress).
Spawning
Attackers will always spawn in the attacker spawn.
Defenders can spawn in two different locations. Either in the castle or in the outposts near the villages outside.
When the attackers have half of the flags or more (one less than the win condition), they are forced to spawn outside the castle. If not, they can decide if they want to spawn in the castle or outside using the /changerespawn [inside|outside] command.
Money
Players can earn money by killing players, capturing flags or supporting the team. There is also a balancer system which supports players by giving them money when they are to weak.
Money can be used to purchase equipment and tools to break into or to repair the castle.
Equipment System (Conquest)
General
The equipment system differentiates between 3 main categories: Melee, Ranged and Armor.
Each player starts with only a default melee weapon. Players can then upgrade and specialize their equipment using the equipment shops.
Upgrading
Equipment can be upgraded at the equipment shops. In most cases, they are located in the castle, the attacker spawn and the villages. Upgrading works like this:
- At the beginning, you can choose one of multiple weapons/armors in each category.
- If you have chosen a specifig weapon/armor, you can upgrade it, which increases the stats of this weapon/armor.
- At certain levels you have to specialize the equipment instead of simply upgrading it. This works in a similar way to deciding on a weapon/armor previously.
Downgrading
Involuntary
- If you die, your current equipment will fall back to the previous equipment level.
- However, there are safe levels from which you will not be downgraded further if you die.
- If you got killed by a enemy who has better equipment than you, you will not be downgraded directly. In this case, you will be downgraded the
otherEquipmentLevel - yourEquipmentLevel-th time you die from this player.
Voluntary
- You cannot switch the weapons/armors or their specializations once you have selected them.
- If you are really sure that you have chosen the wrong equipment, you can buy an equipment reset at the equipment shop. This will reset the selected equipment category to the default level. then you can re-choose your weapon/armor again.
Get Equipment Info
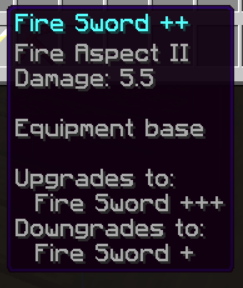
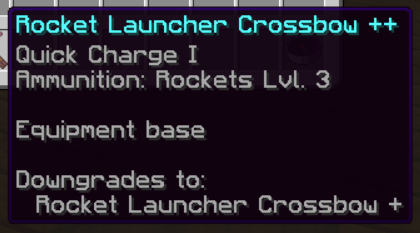
You can always hover over the item with your mouse to get detailed information about it. This section shows you what the values mean.
Equipment Category
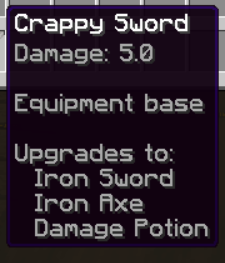
- Upgrades to: Shows the next possible equipment levels you can upgrade your equipment to. If not shown, you have already reached the maximum level in this category.
- Downgrades to: Shows the equipment level your equipment downgrades to when you die. If not shown, you are on a safe level.
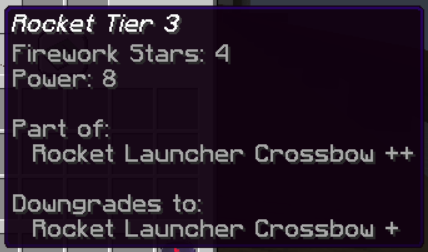
- Equipment base / Part of: Some Items come with other items you need to use them. They are then "part of" another item. "Equipment base" means that the item is not part of any item. For example, the Rocket Launcher Crossbow is the base of the Rocket Tier 3.
Weapon/Armor Stats
- Damage: Attack Damage
- Speed: Attack Speed which is responsible for the attack Cooldown (if not shown: default)
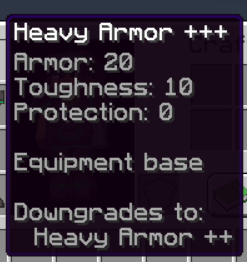
- Armor: Armor points
- Toughness: Armor toughness
- Protection: Level of the protection enchantment
- Other enchantments: Shown like in vanilla
Examples
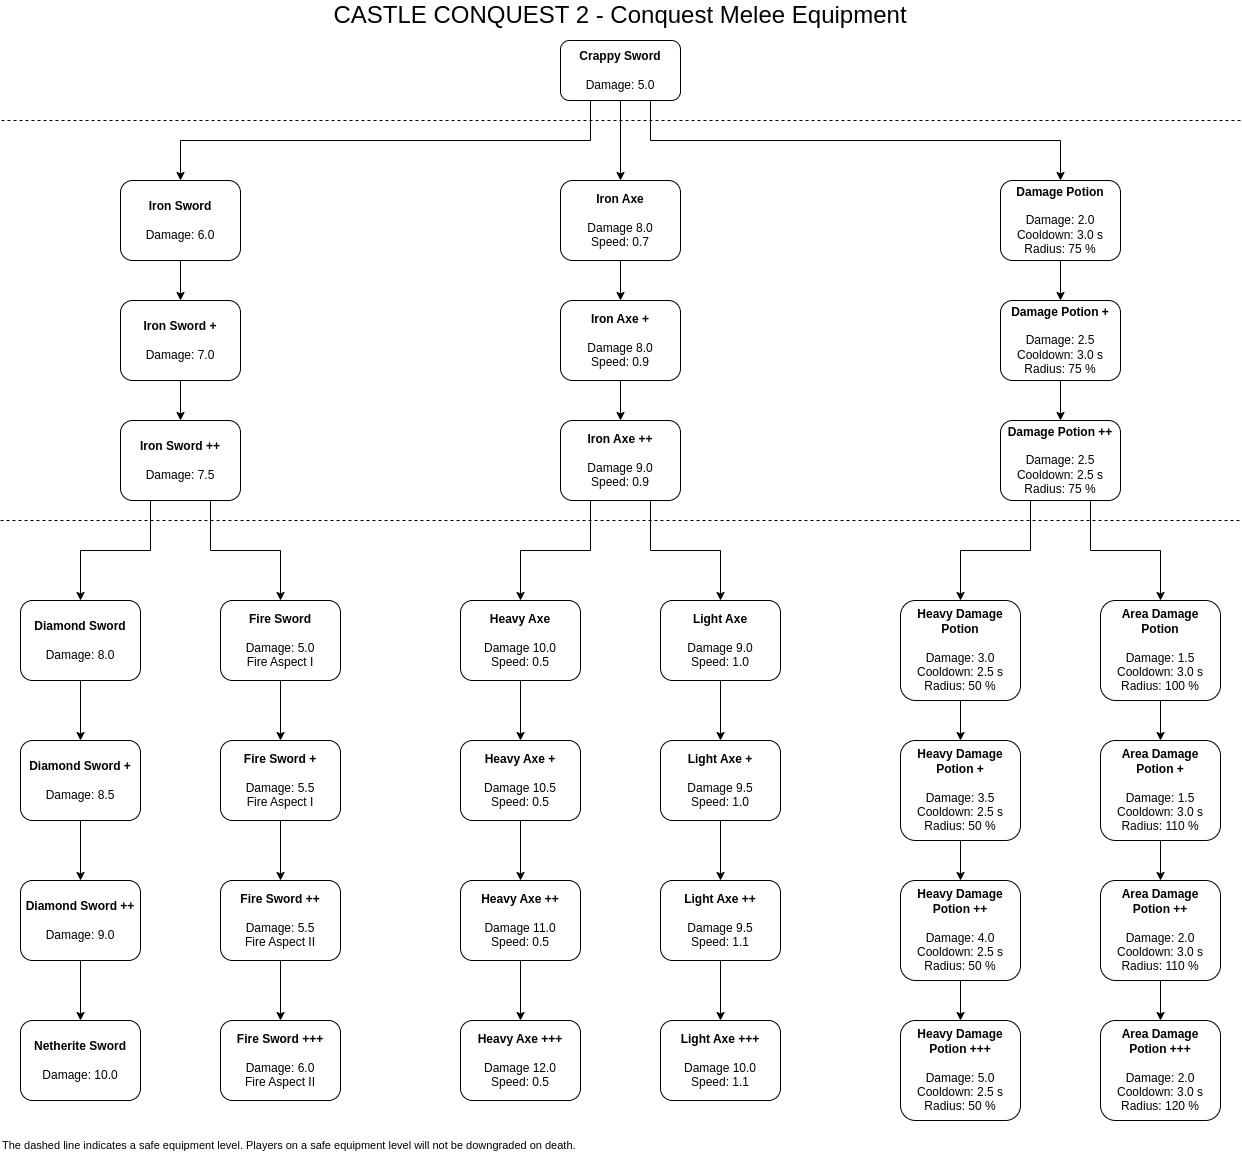
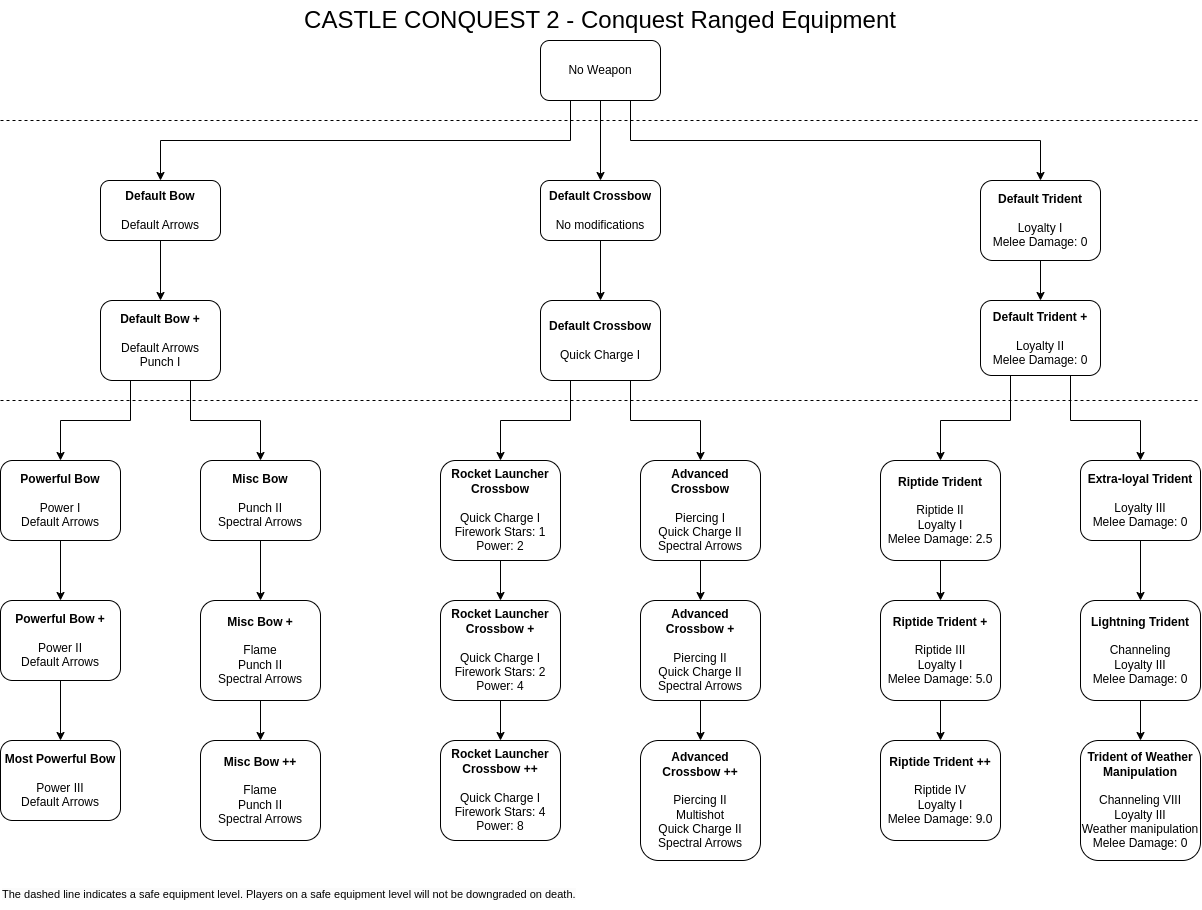
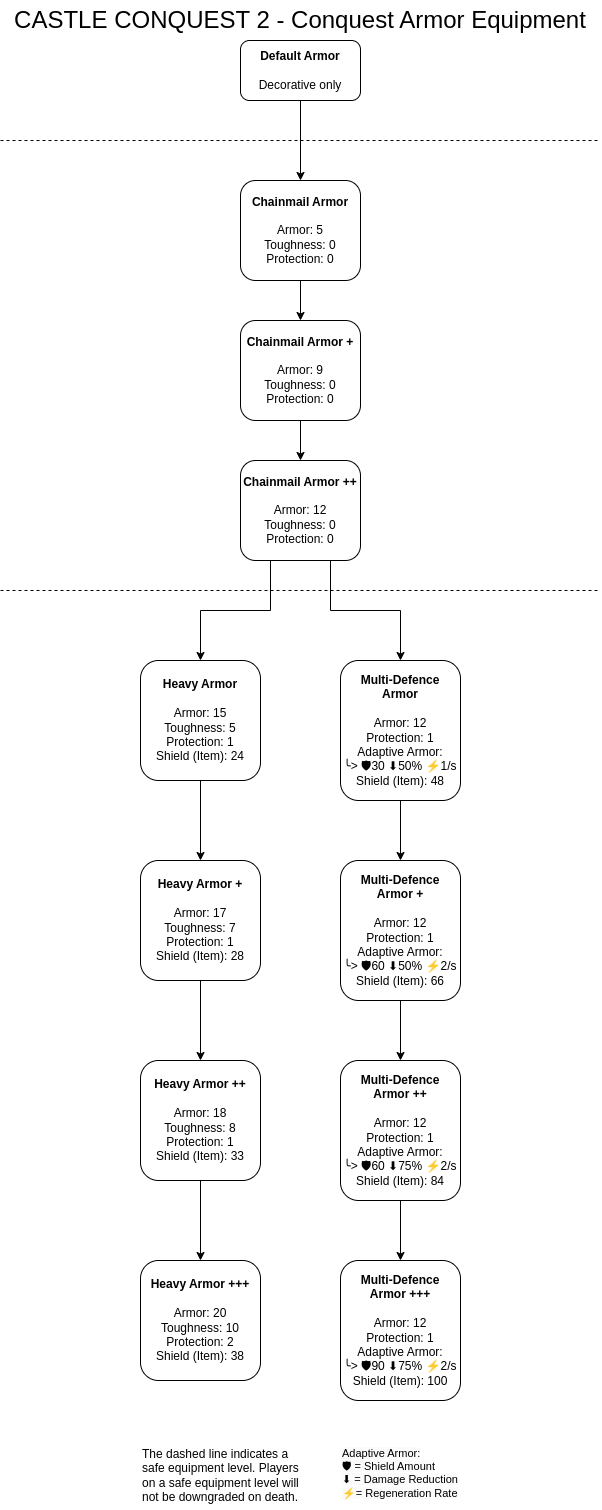
Categories
Here you can see the upgrade maps of the categories. The dashed line shows the safe levels.
Melee
Ranged
Armor
Developer Info
Management command
The player equipment can be managed using the /cc2 game players value command.
Usage
/cc2 game players value <player: (UUID|String)> equipment [<category: String> [<id: Integer>]]
Examples
- Get all equipments:
/cc2 game players value <player> equipment - Get a specific equipment:
/cc2 game players value <player> equipment <category> - Set a specific equipment:
/cc2 game players value <player> equipment <category> <id>
Responsibilities
The ConquestEquipmentSystem handles the equipment. ConquestEquipmentData stores information about one equipment level and contains ConquestEquipmentItems that represents the items of that equipment. The ConquestEquipmentSystem uses the EquipmentSystem (game) as a base.
The ConquestEquipmentGUI is responsible for the equipment shop.
Flags (Conquest)
General
Holding flags is the main objective in conquest mode.
For the attackers to win, they must hold more than half of all flags for 5 minutes.
In order for the defenders to win, the attackers must run out of their available time of 30 minutes.
Both timers are mutually exclusive. This means that if the attackers' 5-minute timer is active, the defenders' 30-minute timer is inactive. The same applies the other way round, but the attackers' 5-minute timer counts up to 5 minutes again in the background as long as it is inactive.
Behavior
| Status | Condition | Result |
|---|---|---|
| IDLE | No enemy team and no capturing progress on the flag | Nothing happens |
| Capturing | Other team is in the majority on the flag | Capturing progress inceases |
| Uncapturing | Holding team is in the majority on the flag | Capturing progress decreases |
| IDLE with progress | No team is on the flag, but there is still capturing progress on it | Capturing progress decreases slowly |
| Tie | Both holding team and other team is on the flag with the same amount of players | Nothing happens |
- When the capturing progress reaches 100 %, the team that had capturing progress on the flag is now the new holding team
- “Team in majority” means that the team has the most players on the flag compared to the other team.
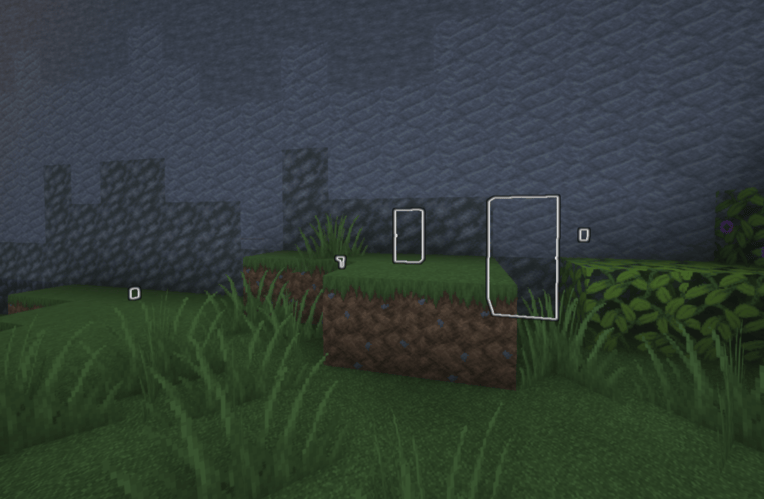
Appearance in world
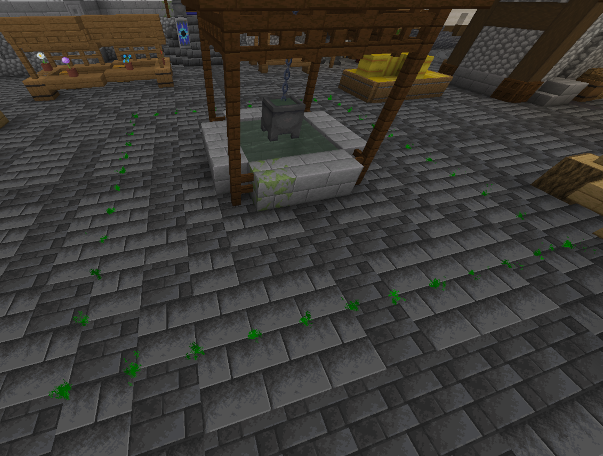
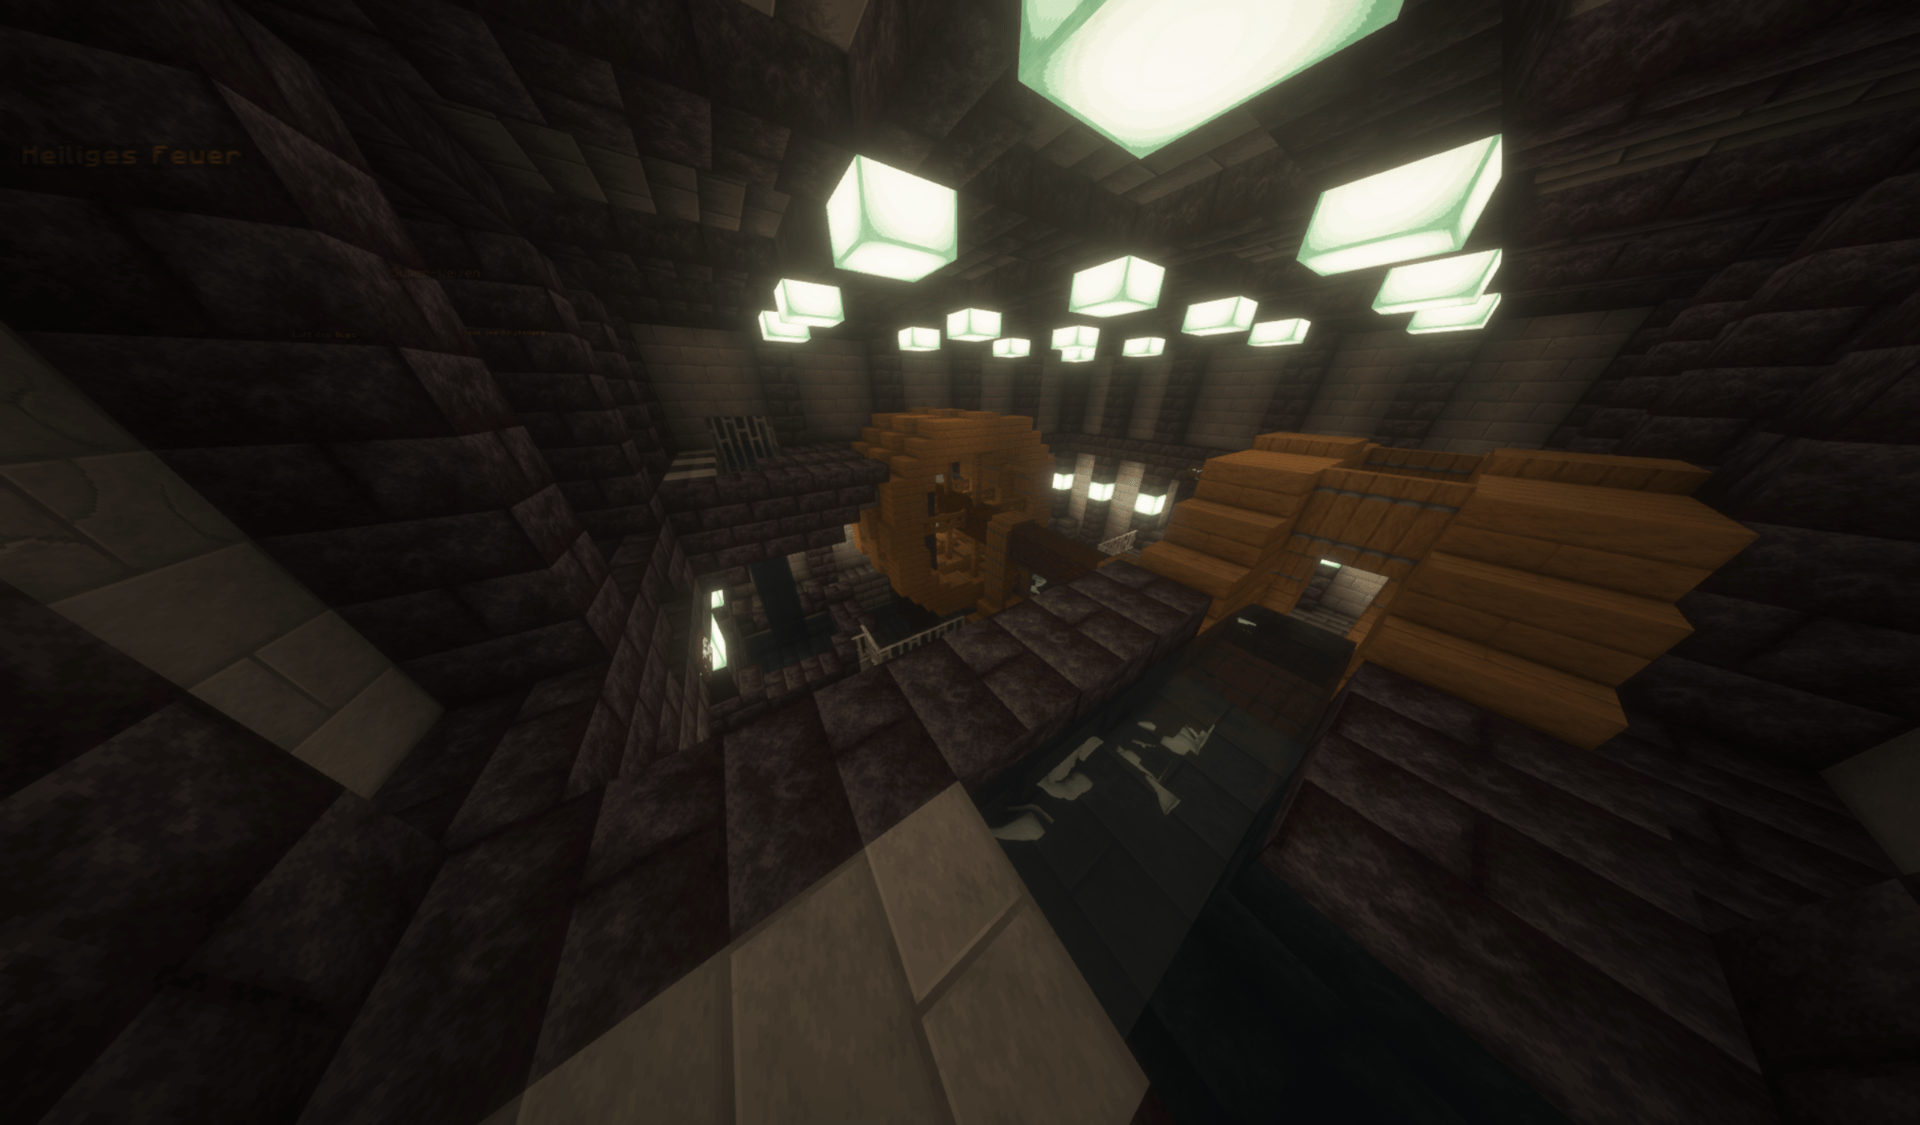
Particles
The green or red particles on the ground are marking a flag area. The particle color is the current holding team of the flag. That means, if the flag is currently controlled by the defenders, the particles are green. When the attackers are holding the flag, the particles are red.
Here you can see how that looks:

Flag Object
A planned feature is that there is an actual flag model in the flag area. Since we currently don't have someone who creates custom models, this feature isn't currently available.
Sidebar
The sidebar shows the flags available.
The color of the flag letter is the current holding team.
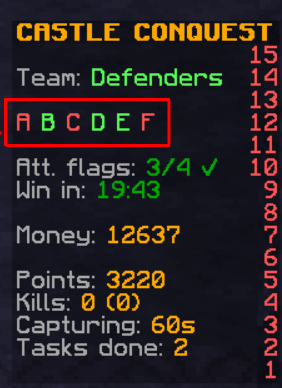
There is also a capturing indicator. It is shown in the color of the team which currently has capturing progress on the flag.
| Icon | State | In this example |
|---|---|---|
 |
Capturing | Attackers are capturing A. Capturing progress of attackers increases. |
 |
Uncapturing | Defenders are uncapturing A. Capturing progress of attackers decreases. |
 |
IDLE with progress | Attackers are not actively capturing A, but still have progress on it. Capturing progress of attackers decreases slowly. |
| N/A | IDLE or Tie | Defenders hold A without any capturing progress by the attackers, or both attackers and defenders have the same amount of players on the flag. |
Flag Locations
Default map
| Letter | Location |
|---|---|
| A | In front of the main gate |
| B | Center of the Yard |
| C | Tower in the Throne Building of the Yard |
| D | Park (inofficially known as "Oxygen") in the basement |
| E | Dining room in the basement |
| F | Water Generator Room in the basement |
Developer info
Control command
Usage
/cc2 game flags [<flagId: int> [area|captureprogressdecreaseidle|captureprogressdecreaseuncapture|captureprogressincreasecapture|captureprogressincreaseidle|capturingprogress|capturingteam [reset]|holdingteam [<holdingTeam: int>|id|location|majorityteam|name]]
Examples
- Get list of flags:
/cc2 game flags - Show info about one flag:
/cc2 game flags <flagId> - Show specific info about one flag:
/cc2 game flags <flagId> captureprogressdecreaseidle - Change holding team:
/cc2 game flags <flagId> holdingteam 1 - Reset capturing team (and progress):
/cc2 game flags <flagId> capturingteam reset
Flag states
How it works internally
Instead of the flag states which are shown to the outside, the flag uses 3 different values which then results in the flag state:
holdingTeam: The team that is currently holding the flagcapturingTeam: The team that has currently capturing progress on the flagmajorityTeam: The team that has currently the majority of players on the flag
Then there is also the capturingProgress:
- Depending on the values, the
capturingProgressincreases, decreases or remains unchanged. If thecapturingProgressreaches a certain value, thecapturingTeambecomes the new holdingTeam. - The
capturingProgressresets to0if there is nocapturingTeam. - If the
capturingProgressis0or below, thecapturingTeamis cleared - The
holdingTeamcannot be thecapturingTeam
Internal values to flag state
| Internal name | Condition | Result | Shown name |
|---|---|---|---|
| IDLE | capturingTeam not set |
Nothing happens | IDLE |
| CAPTURING | capturingTeam is set and capturingTeam == majorityTeam |
capturingProgress increases |
Capturing |
| UNCAPTURING_BY_OWNER | capturingTeam is set and majorityTeam == holdingTeam |
capturingProgress decreases |
Uncapturing |
| UNCAPTURING_BY_OTHER | capturingTeam is set and majorityTeam != holdingTeam != capturingTeam |
capturingProgress decreases |
N/A (not possible except when using commands) |
| UNCAPTURING_IDLE | capturingTeam is set and majorityTeam not set |
capturingProgress decreases |
IDLE with progress |
| MULTIPLE_TEAMS | capturingTeam is set and majority team set to multiple teams value (-1) |
Nothing happens | Tie |
Responsibilities
- Each flag is represented by an object of
ConquestFlag. They are stored in the flags map inConquestGame. - A
ConquestFlagCapturedEventis fired when the holding team of the flag changes (due to capturing). Cancelling this event will prevent the holding team from getting changed, but since it does not change anything else, the flag will try to change its holding team again the next tick if the conditions are the same. - A
ConquestFlagPlayerOnFlagEventis fired for each player inside the flag area. Cancelling this event will remove the player from the majority team calculation for the current tick.
Map
The map is where you play the game on.
There is currently only one map available, but it is possible to create new maps (if we would have people who can build it).
Maps have special features, like Keycard keycard doors. cameras and so on.
You can view a list of all features below.
Cameras
General
Cameras are there to observe opposing players.
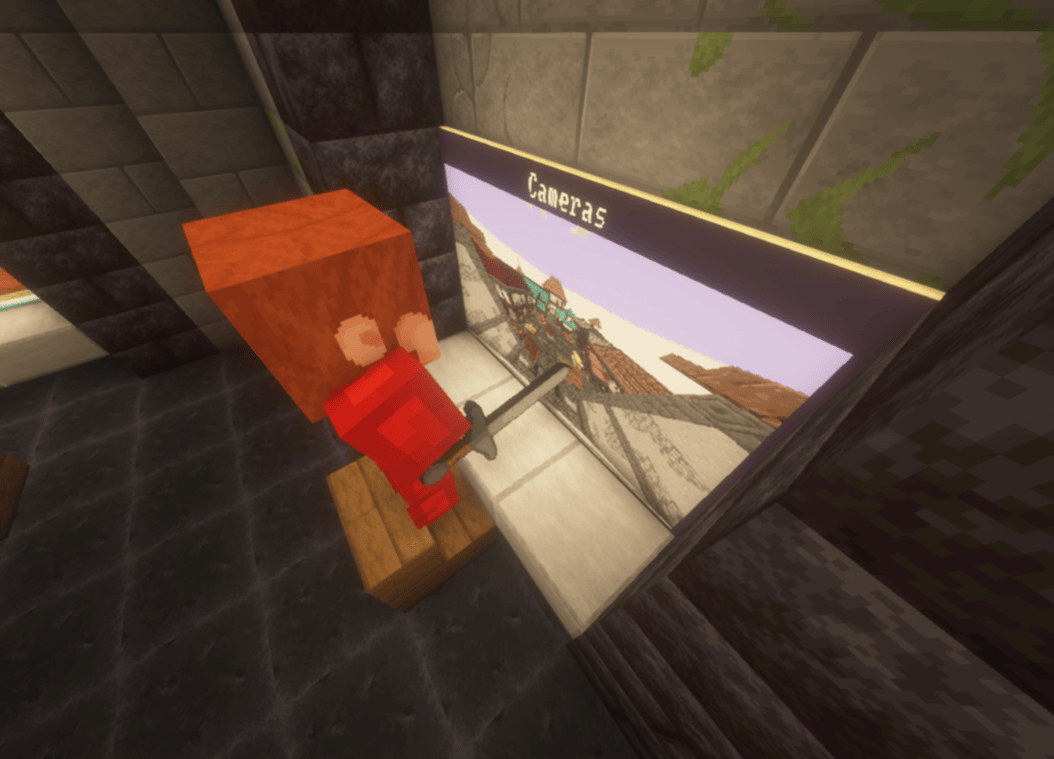
How to use
Go to the camera screen and click on a camera.
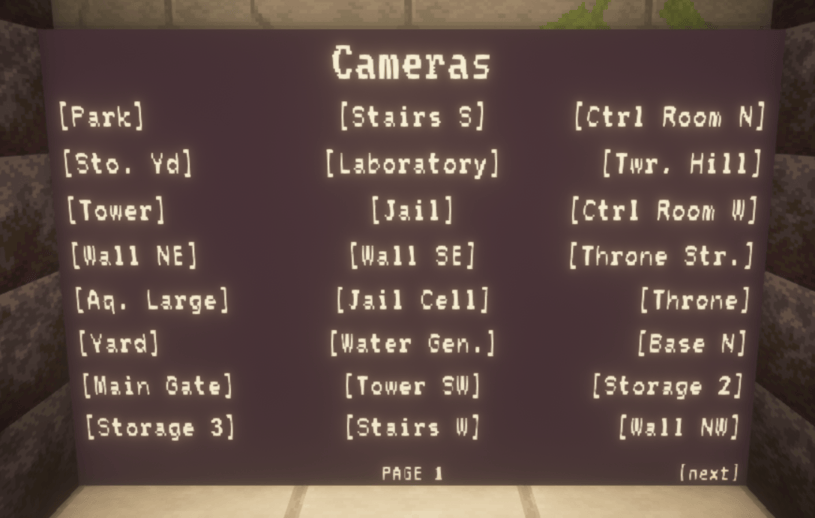
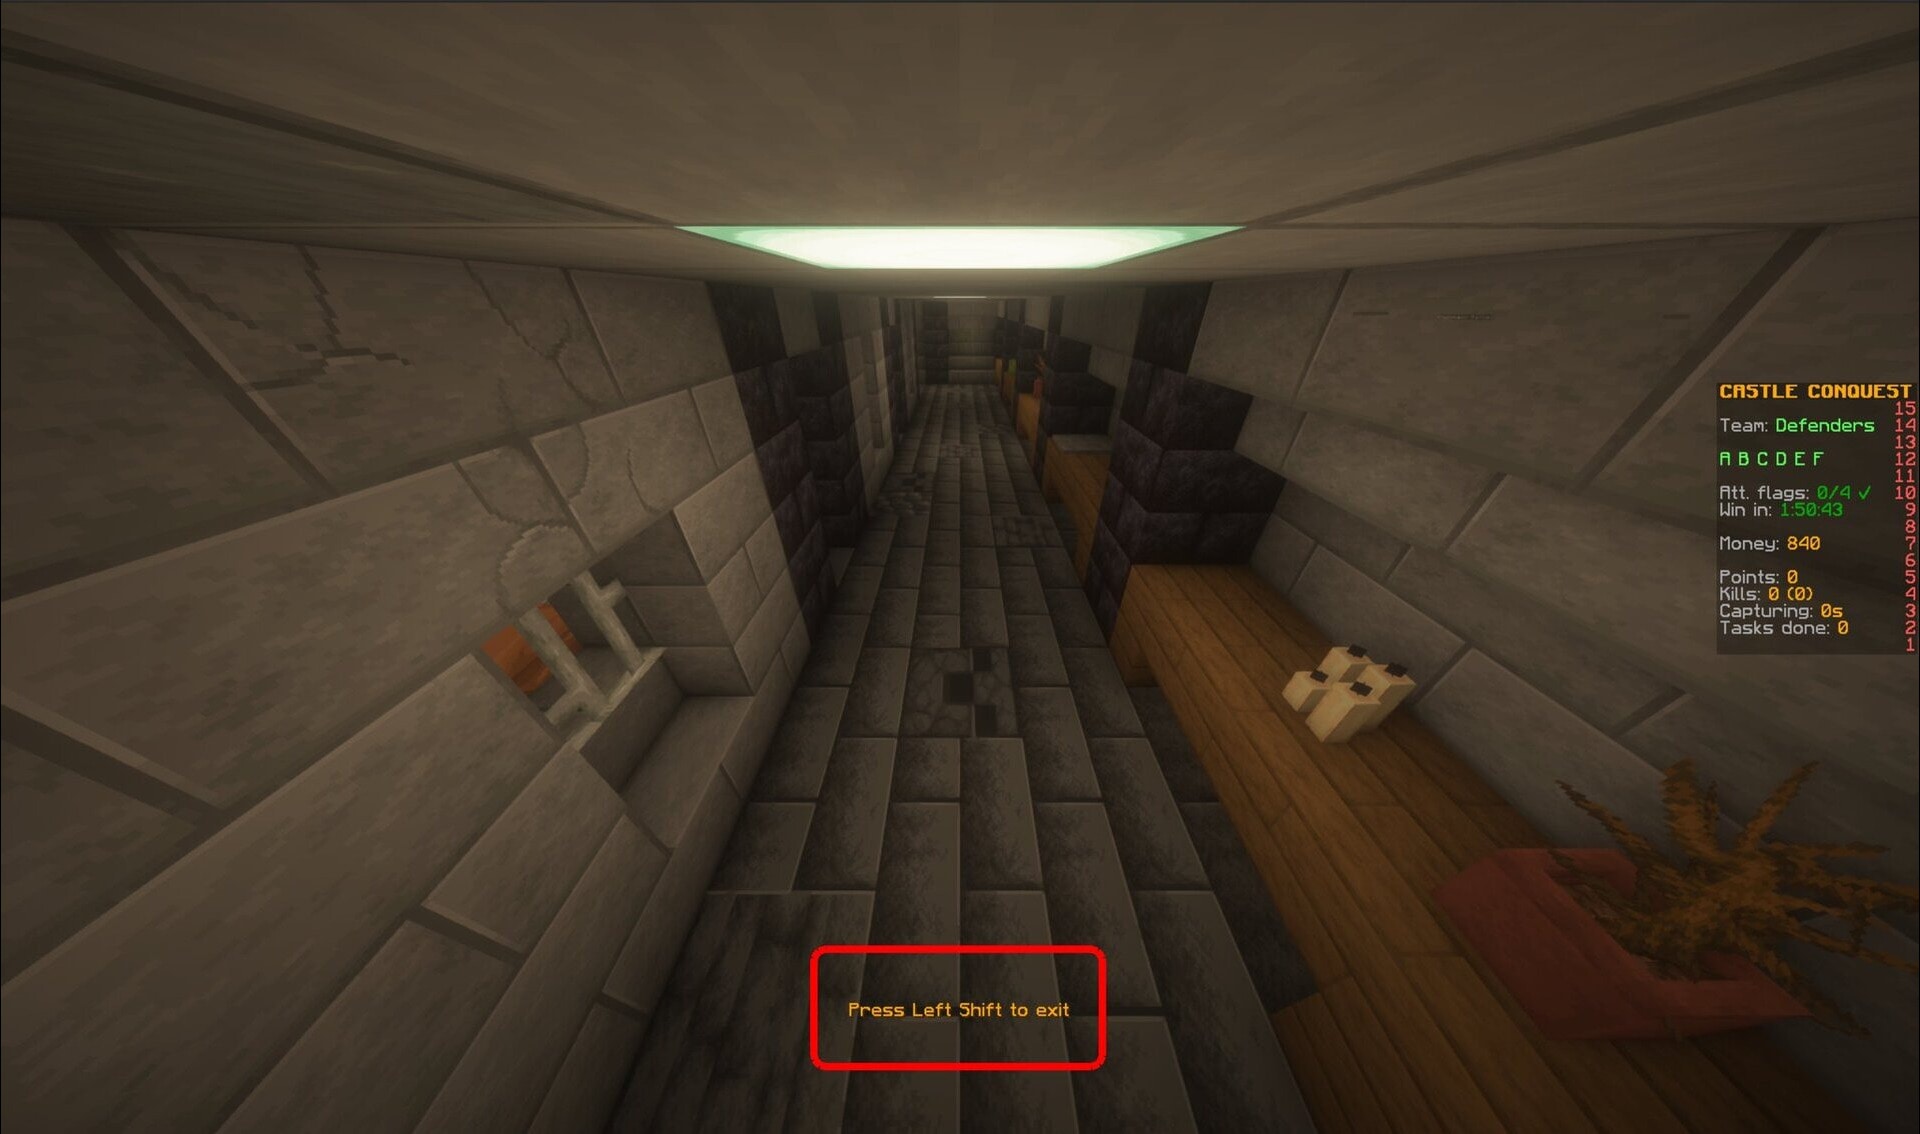
While you are in the camera, you can make your observations.
To exit the camera, press SHIFT.
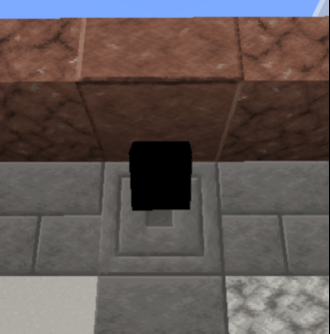
Why there are no cameras?
Depending on the map and game mode, some or all cameras are not available from the start, but must first be unlocked by upgrading.
If no cameras are available, the camera screen will display “No cameras found”.
Destruction and repair
Destroy
Enemies can destroy cameras by hitting the camera with a melee weapon or shooting it with a bow. The camera then explodes and can no longer be used. Players who are currently using the camera will be kicked out of it.
Repair
Cameras can be repaired by the castle crew using a replacement camera. These can - depending on the map and gamemode - be bought (in conquest, the Tool Seller sells them).
Right-clicking with the repalcement camera onto the broken camera will repair the camera.
For some cameras, you might need to get creative ideas how to access them.
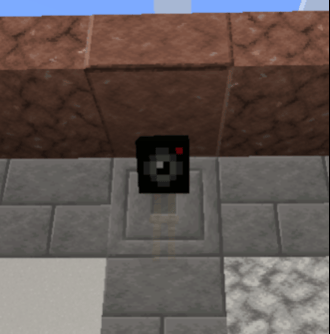
A working camera looks like this:
Removing players from cameras
To get a player out of a camera, push that player that's standing in front of the camera. The player will then leave the camera and you can kill them if you want to.
Please note that you can't see some armor parts of that player while they is using the camera.
Developer Info
Control command
Usage
/cc2 map value cameras [camera id] [property] [value]
Examples
- List cameras:
/cc2 map value cameras - Get camera properties:
/cc2 map value cameras <camera id> - Get/Set camera property
/cc2 map value cameras <camera id> <property> [value]
Responsibilities
Camera objects (CastleCamera) are stored in the cameras map inside the CastleMap.
The player standing in front of the camera while the player is inside the camera is handled by PlayerDummy.
The camera monitor is handled by CameraScreen which is a ValueUpdatingSynchronizedScreen.
A CameraPlayerAddEvent is fired when a player enters the camera. A CameraPlayerRemoveEvent is fired when the player leaves the camera. The first one can be cancelled to regulate which player can join the camera and which not.
A CameraBreakEvent is fired when a camera gets destroyed. A CameraRepairEvent is fired when a camera gets repaired. Both events contains the players that have performed this action and are cancellable to regulate which players can destroy/repair cameras.
Doors
General
Doors are used in the castle to deny unauthorized persons access to certain areas. However, there are also a few doors for purely decorative reasons.
States
Doors can either be open, closed or destroyed. A destroyed door is like an open door, except that it can no longer be controlled. Destroyed doors can be repaired.
A door can also be locked or unlocked. If a door is locked, it can no longer be controlled by certain means, such as the keycard reader.
Controlling doors
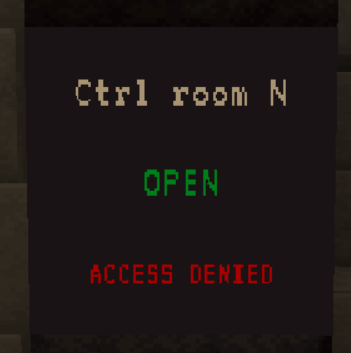
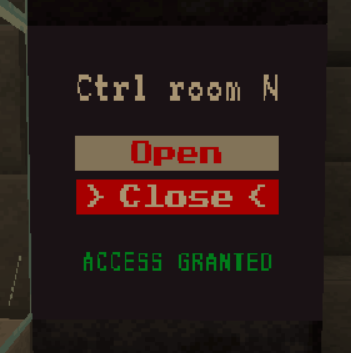
Keycard Reader
There is a keycard reader next to most doors. If you have the correct keycard in your inventory, “Access Granted” appears on the display and the door can be opened/closed by clicking on the corresponding button.
If “[!] Locked” appears on the screen, the door is locked and can no longer be controlled by the keycard reader (see door control screen).
On the default map, keycard readers requires power level 1 in order to work.
Door control monitor
The door control screen can be used to centrally manage all doors in the castle.
The door control screen has different functions depending on the level:
- display door status
- display door status, open/close doors
- display door status, open/close doors, lock/unlock doors
The door control screen can be upgraded in some game modes to unlock a higher level. In other game modes, the door control screen is deactivated or set to a specific level that cannot be changed.

On the default map, the door control monitor requires power level 1 in order to work.
Auto-opening
Some doors will just automatically open when a player is nearby and will close if the player is gone.
Destroying doors
If you are locked in because the castle has no power or you just want a permanent entrane into the castle without restrictions, it's probably time to send a door to hell by bombing it into oblivion.
There are several ways to do it.
Gate Cannon
If you want to destroy the gates of the castle, you can use the gate cannon for it.
The Gate Cannon must be placed in the designated position so that it can be set up. Once it has been passed in the right place, it is automatically set up. Otherwise an error message will be displayed.
To fire the gate cannon, you need to find the "Fire"-Button. It is normally located on top or on the back side of the cannon. You then need to shoot at the gate until it breaks.
Please be aware that the cannon projectiles have an explosion size of 10. This will kill other players when they are near the door (you get kills from that btw).
To destroy the gate cannon, you can just break any block of it and it will disappear.
C4 / Door Explosive Charges
You can blow up doors using C4.
To attach a charge of C4 to a door, right-click on the door with the C4 item. The C4 charge is armed immediately after being placed and will explode after a few seconds.
However, this does not mean that the door will be destroyed. Most doors need more than just one charge of C4. So if only the one C4 explodes, it is useless and the charge of C4 has been wasted. You should therefore always make sure that as much C4 as possible is attached to a door.
If C4 is attached to a door, it cannot be opened or closed.
C4 can be removed again by right-clicking on it. You will not get the item back.
Repairing doors
Door repair kit
Doors can be repaired using a door repair kit. To use the Door Repair Kit, right-click in the frame of the destroyed door. The door frame is filled with scaffoldings if the repair is in progress. The current progress is displayed in the action bar. A repair can be canceled during construction by hitting the scaffolding. Once the repair is complete, the door appears and opens automatically.
Developer Info
Control command
Doors can be controlled by using the /cc2 map value doors command.
Usage
/cc2 map value doors [<doorId> [(state|location|animationtime|active [(true|false)]|(broken [true|false)]|(locked [true|false])|(name [<name>])|open|close|forceopen|forceclose|destroy|repair)]]
Examples
- List all:
/cc2 map value doors - Get info:
/cc2 map value doors control_room_north - Get specific info:
/cc2 map value doors control_room_north broken - Set info:
/cc2 map value doors control_room_north broken true - Actions:
/cc2 map value doors control_room_north open
Responsibilities
The door system is using the DoorManager inside CastleMap to handle CustomDoor objects which are representing each door.
The "door controlling systems" (like the keycard readers) are handled by DoorAccessProviders, which are stored in the DoorAccessContainer which is inside CastleMap. DoorAccessProviders can be replaced (e.g. by upgrade tasks inside the specific map implementations) to change door behavior.
The door control monitor (DoorControlMonitor) is doing it's own thing, without any relation to the DoorAccessProviders.
Map Destruction
General
Map destruction provides a way for attackers to get into the castle. It is also used to access special areas on the map.
Players can't just destroy every block in the world. There are special blocks (for example in the castle wall) players can destroy with the right tool.
Destroyed blocks can be repaired, also using a special item.
Break blocks
-
Get the tool for the block you want to break. You will most likely use a "Wall Breaker" to destroy blocks in the castle wall or a "Cutting Tool" to destroy iron bars (aqueducts).

-
Take the right tool in your hand. You will now see all blocks you can destroy with the tool glowing.
-
Break the block you want to break.


Repair blocks
-
Get a repair tool. You will most likely use a "Wall Repair Kit" for plugging holes inside the castle wall.
-
Right-click with the repair tool onto the broken block.
-
Wait until the timer has finished. After the timer has finished, the block is repaired. When the timer is running, the repair kit can be removed by right-clicking on it. This can be used by attackers to prevent the wall repair.
Useful information
- The status monitor of the default map can detect if the castle is damaged. It shows a warning message at the bottom and shows a red marker at the side where the damage is.
Developer information
There is currently no command which allows managing damageable blocks.
Destroyable/repairable blocks are currently handled by CastleRepairManager. It manages DestroyableCastleBlock objects. Both of them are using the BlockModificationManager and BlockModificationZones to add exceptions to allow map destruction at this location.
Power Management
General
There are many systems in the castle that require electricity. Some of them more than others.
The castle crew must ensure that the systems in the castle have a functioning power supply to ensure their functionality.
Attackers, on the other hand, can try to sabotage the power supply in order to disrupt the systems in the castle and weaken the castle crew.
This article only describes the standard power system. Other maps may use a different system.
How the energy system works
How it works
In the castle's energy system, there is no amount of electricity that is available and no direct consumption.
Instead, there is a power level that indicates how much energy is currently available to the castle.
Every energy source can influence the power level. Some energy sources raise it to a certain value, some increase it by a certain value. In addition, there are energy stores that are charged as long as other power sources are available and are discharged when the castle has too little power.
In the end, the global power level of the castle is calculated from all power sources. Certain systems then only work from a certain power level. If it is lower, those systems will not work or will have limited functionality.
Types of power sources
Producers
Each energy producer provides a specific power level.
This power level can be made available in two different ways:
- Hold: Keeps the power level at a certain value. If there is already an energy source that provides a higher power level, the energy source has no influence.
- Add Up: The power level of all add-up power sources is added together. This added value then forms another hold power level.
Storages
Power storage systems store energy as long as they provide the same or a lower power level than other power sources.
However, if they provide a higher power level, they are discharged.
Depending on the energy storage device, the speed of charging and discharging depends on the distance between the power level produced and the power level provided by the energy storage device.
Calculation of the power level
The power level is calculated using the following formulas:
$$\text{addUpPowerSourceLevel} = \sum_{i=1}^{n} P_{\text{source}, i}$$
$$\text{heldPowerSourceLevel} = \max_{k=1, \dots, m} (P_{\text{held}, k})$$
$$\text{providedPowerLevel} = \max(\text{addUpPowerSourceLevel}, \text{heldPowerSourceLevel})$$
$$\text{highestPowerStorageLevel} = \max_{k=1, \dots, o} (P_{\text{storage}, k})$$
$$\text{powerLevel} = \max(\text{providedPowerLevel}, \text{highestPowerStorageLevel})$$
If highestPowerStorageLevel is higher than providedPowerLevel, the power storage will discharge. If it is empty, it will return power level 0.
If highestPowerStorageLevel lower or equal than providedPowerLevel, the power storage will charge.
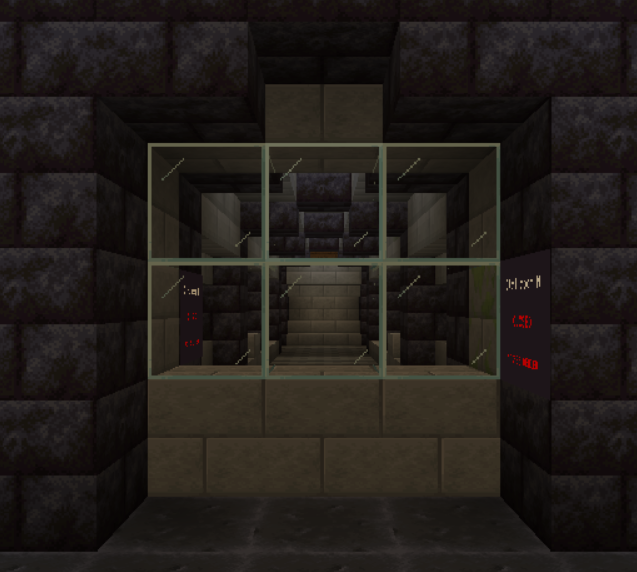
Power control monitor
The power control monitor displays all power sources and the current power level. It can also be used to change some settings relating to the power supply.

From left to right and top to bottom:
- Name: The name of the power source (in this picture it is "Small Aqueduct", "Large Aqueduct", "Battery" and "Generator")
- Storage Type: The type of the storage
=: Held power producer+: Add up power producerS: Power storage
- Status indicator: Displays the current status
- On: Source enabled and producing power
- Off: Source disabled or not producing power
- FLL: Storage-specific status indicator which stands for "Full"
- CHG: Storage-specific status indicator which stands for "Charging"
- Provided power level: The power level the energy source is currently providing ("-----" for nothing and "PWR x" for power level)
Storage-specific:
- Charge Level: The current charge level of the storage (in this picture 100 %)
Battery-specific (specific type of storage):
- Power level selection: Press "<" or ">" buttons to select the power level (in this picture "<0>, where 0 is the selected power level)
- Autostart indicator:: If "AS" is shown, the autostart feature is available for that battery
Generator-specific:
- Fuel indicator: The time the fuel of the generator is burning (in this picture "FUEL 0s + 0s"). The first value is the fuel currently burning inside the generator. The secon value is the fuel inside the generator's inventory.
Power Producers
There are several energy sources to power the castle.
Some of these are internal, others external.
The most important ones are listed here, but other maps may also have other energy sources.
Aqueducts
Aqueducts drive a water wheel that generates electricity. They are the main source of energy on the default map.
An important advantage of the aqueduct as an energy source is that the player does not have to do anything to maintain it as long as the aqueduct is not deactivated manually. One disadvantage, however, is that it can be sabotaged from the outside. As the castle crew, you then have to leave the castle to switch it back on.
On the default map, the large aqueduct produces power level 2, the small one power level 1. If both are active, they produce power level 3 because they are “add up” power sources (see calculation). The small aqueduct automatically fills with water during thunderstorms, even if the aqueduct is deactivated.
Coal generator
The power generation furnace generates energy by burning all possible fuels that can be found on the map.
One advantage is that the items intended for combustion can be stored in the castle so that the castle crew does not have to leave the castle to maintain the power source.
A major disadvantage, however, is that you need enough fuel. If the castle runs out of fuel, the power supply fails and the castle crew must obtain new fuel from outside.
On the standard map, the generator raises the power level to 2. If there are power sources that produce a higher power level, the generator does not change anything (and should therefore be deactivated by the user).
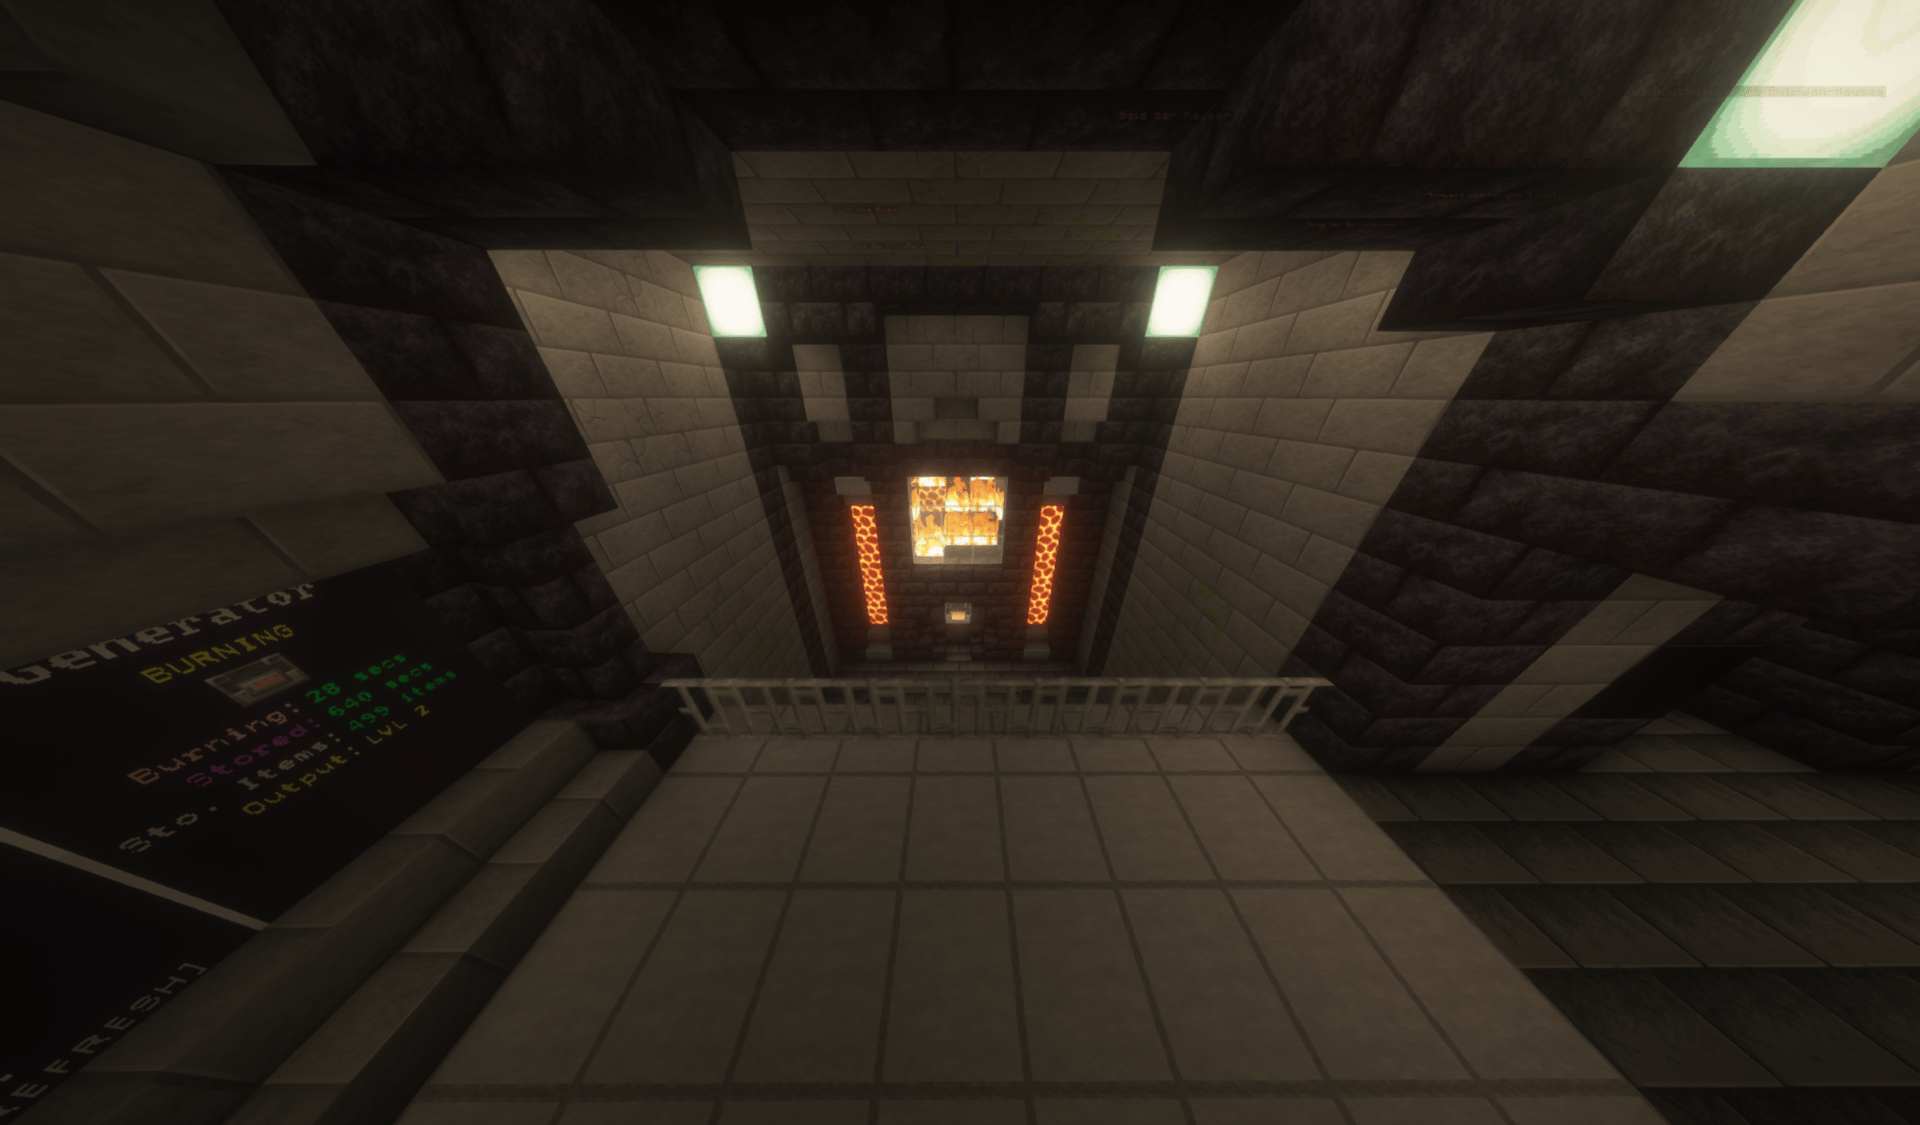
There is also an Easter Egg that can be used to burn more than just items in the generator.
Power Storages
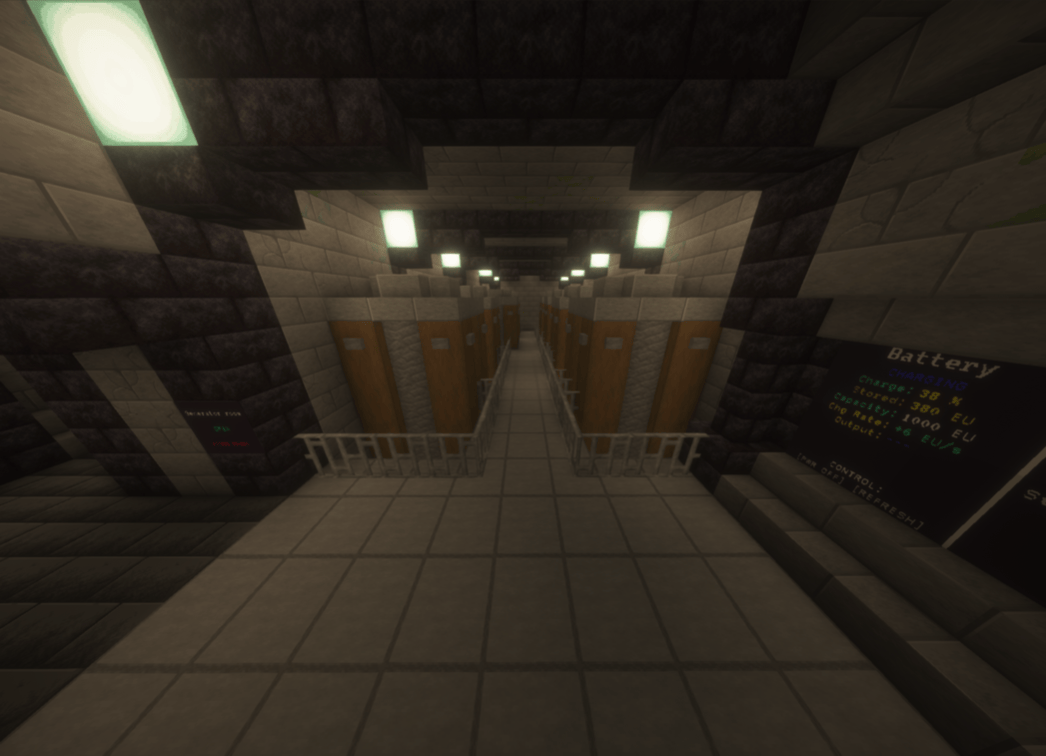
Battery
The batteries are an energy storage option that makes it possible to delay power failures somewhat and thus create a period of time in which the castle crew can restore the other power sources.
Batteries have a charge level, a capacity and a maximum power level that they can provide.
Charge level
The capacity indicates the maximum amount of energy the battery can store.
The charge level of the battery indicates how much energy the battery currently still has stored. If this drops to 0, the battery is empty and does not provide a power level. If the battery is charged, the charge level increases until the capacity is reached.
How exactly the charge level in the battery changes when it is charged/discharged differs depending on the battery. The standard calculation is as follows:
- Charging: $chargeLevel = chargeLevel + (powerLevelDifference \cdot chargeMultiplier)$
- Discharging: $powerLevelDifference = highestPowerStoragePowerLevel - highestSourcePowerLevel$ $chargeLevel = chargeLevel - (powerLevelDifference \cdot dischargeMultiplier)$ Here, $providedPowerLevel$ is the power level provided by the current battery, and $highestSourcePowerLevel$ is the highest power level provided by power sources.
On the default map, $chargeMultiplier$ is currently $2$ and $dischargeMultiplier$ is currently 3.
Power level
The maximum power level indicates the maximum power level that the battery can provide.
The power level indicates how much power the battery is currently actually providing. This value can usually be set by the user and cannot exceed the maximum power level.
The higher the selected power level of the battery, the faster it discharges.
Setting the power level allows users to weigh up between the functionality of some systems and a longer runtime. The battery can also be used as a buffer if a higher power level is required for a short time than is currently available from power producers.
Autostart
If the user has deactivated the battery and the power fails in the entire castle, the user can no longer activate the battery via the control screens, as these will also fail.
The autostart feature solves this problem by automatically activating the battery as soon as the power in the castle fails.
This feature is not available for all batteries.
Developer Info
Control Command
Usage
/cc2 map powermonitor [(override [value]|powerlevel|sources [source id] [property] [value])]
Examples
- Show general status:
/cc2 map powermonitor - Override power level:
/cc2 map powermonitor override <power level>(set override to -1 to disable) - Show power level:
/cc2 map powermonitor powerlevel - Get power sources:
/cc2 map powermonitor sources - Get power source properties:
/cc2 map powermonitor sources <source id>> - Get/Set power source property:
/cc2 map powermonitor sources <source id> <property> [value]
Responsibilities
The PowerManager handles all power sources and power storages.
Power producers have to implement PowerProducer and power storages have to implement PowerStorage. Then they have to be registered to the power manager.
Default power producers are PowerGenerator and WaterPipe (Aqueduct). Default power storage is Battery.
A PowerLevelChangeEvent is fired when the power level of the castle changes. It is not cancellable.
Power-consuming devices can use an implementation of PowerProviderto check if power is available.
The power control monitor is handled by PowerMonitor, which itself is a ValueUpdatingSynchronizedScreen.
Upgrades
What are Upgrades?
Upgrades allow players to enhance functionality of the map. They can be used to optimize existing systems, unlock new mechanics, or customize the game world.
How to get Upgrades?
Getting/unlocking upgrades depends on the specific gamemode you are currently playing. Some gamemodes have ways to get upgrades, some are always on a specific upgrade level for certain upgradable things.
For example, in Conquest there are upgrade missions. Completing those missions will unlock an upgrade. In Rush, there is no way to upgrade the castle. The castle there is in a "fixed state", depending on the zone the gamemode is currently in.
Upgrades
The upgrades on the default map are the following:
- Battery Upgrade: Increases the battery capacity and therefore the time the castle can run its electrical systems without an external power source.
- Status monitor upgrade: Adds new features like player detection to the status monitor.
- Door Upgrade: Adds centralized control of all doors in the castle through the door control monitor. On the first level, the status can be viewed. On the second, they can be opened or closed and on the third level they can be locked or unlocked.
- Camera Upgrade: Adds cameras to the castle to observe the enemies.
Developer Info
Control command
/cc2 map value upgrades [upgrade id] [level|(null)]
Responsibilities
Upgrades (CastleUpgrade) are managed by the CastleUpgradeManager).
The UpgradeAppliedEvent is fired when an upgrade has been changed. It contanis the previous and the new upgrade level and the upgrade id.
How upgrades work
Applying/removing Upgrades
The CastleUpgrade contains a list of Level interfaces (which are representing upgrade levels).
The Level interface contains an onApply and onRemove method.
When an upgrade level has been changed, the onRemove-method of the old upgrade level is called. Then, the onApply-method of the new upgrade level is called.
If the upgrade is removed (unlikely, but possible), only the onRemove-method of the previous applied level is called, without calling any onApply method.
In the implementation of the onRemove method, the entire status of the Level must be completely reversed. After onRemove has been called, none of the changes to the level may remain.
It is absolutely essential that a level is completely cleaned up in the onRemove method. No remnants of the old state may remain. If there are overlaps between the old and new level, these must be explicitly restored in onApply of the new level. IF YOU DON'T FOLLOW THIS RULE, THINGS MAY BREAK!
Example
When the onRemove-method of the battery upgrade is called, it completely removes the battery block structure, regardless if it is there or not. Then, in the onApply-method, it puts the new block structure into the world.
This ensures, that if the battery upgrade is not upgraded linear, but set to a random level, everything is set correctly. This also ensures that if the battery upgrade is removed, all batteries disappear.
Items
- Cutting tool: Can break iron barsand other light-resistent materials.
- Door Explosive / C4
- Door Repair Kit
- EMP: An item which destroys all keycards in the world when triggered. This includes all items which have a keycard functionality, such as writable keycards, replica keycards, and any other types of keycards.
- Flashlight: Gives you night vision and prevents and allows to see in the castle's basement when the light is off.
- Gate Cannon
- Keycard (writable): A keycard where permissions can be added to or removed from at the Keycard Manager villager. Also known as "Keycard".
- Keycard (other): Other keycards for the doors, which are not writable keycards. Those keycards are gamemode-dependent. An example is the "Replica Keycard" from Conquest.
- Old pickaxe: Can be used to obtain coal ore in the mine.
- Siege Tower: Spawns a tower in front of the castle wall get on the castle walls. Can be destroyed by destroying any block of it.
- TNT: When placed, it triggers immediatly and explodes. Available with variable amount of power.
- Replacement camera
- Wall breaker: Breaks damaged parts of the castle wall
- Wall Repair Kit
Map Rules/Behaviors
The map has some default behavior:
- You can't break or place blocks by default
- You can't interact with or damage entities
All of this can be overridden for specific cases.
For example, players can destroy blocks in the castle walls with the correct tools. Players can also interact with item shops.